Flight sims can be very demanding on your GPU and even on your CPU in VR. IL2 is based on a somewhat dated engine and it struggles to maintain 90 FPS in VR even on high end gaming rigs. So you must make some compromises and reduce some settings to get the best experience. But all settings are not created equal. Some have a massive impact on performance while others barely move the needle. Similarly, some settings can be more important for an immersive visual experience but this also comes down to personal preference.
Let’s look at all the options first and see what they actually do.
1. In-game Graphics Settings

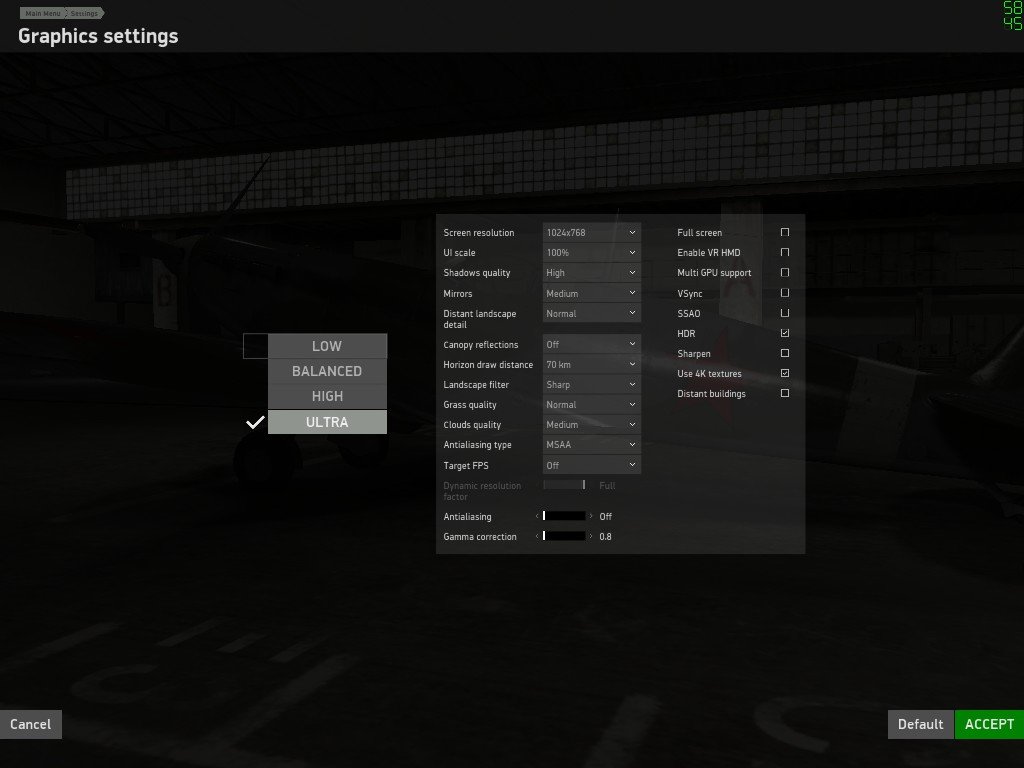
Screen Resolution – This is the resolution of the display on your flat screen monitor. Since you won’t be looking at it anyway, you can reduce this to something on the lower end. The performance impact is minimal though.
UI Scale – This increases the scale of the UI which can be helpful if you have a low resolution headset and can’t read the menu items and text.
Shadow Quality – One of the more important graphics settings. Shadows can have a BIG impact on both performance and graphical quality. So I try to keep them as high as possible. I set them to high, but if you are having trouble, you can try reducing them. The cockpit looks very ugly when you switch them off so this is probably the most important setting form a visual standpoint.
Mirrors – Mirrors have a small but noticeable impact on performance. I would certainly like to use them more, but they are so small that you hardly see anything in VR.
Distant Landscape Detail – The game renders distant landscape in less detail than landscape that is closer to you. Just leave it off. You will barely notice the quality of the distant landscape anyway.
Canopy reflections – It doesn’t do much for immersion in VR and is hardly noticeable. Leave it off.
Horizon Draw Distance – This means how far away from your current position is the horizon drawn. I think 70 km is the sweet spot, but you can lower it if you don’t mind the land in the far off horizon not rendering.
Landscape Filter – Sharpen looks very good on monitor, but in VR the difference is hardly noticeable between off and sharpen. Blurred doesn’t look good though. I leave it on sharpen since it doesn’t seem to impact performance much.
Grass quality – Don’t care much about grass since we belong in the air! Normal is fine and increasing it doesn’t really make it better so why bother.
Clouds Quality – This is another big one. Clouds are very important in IL2 and can have a big impact on our experience. But they are also very demanding so you will have to find a sweet spot. I set mine to Medium but its another setting I would like to increase.
Antialiasing type – MSAA is very GPU expensive and in other VR games like DCS it is a must. But in IL2, the difference between MSAA off and 2x or even 4x MSAA is hardly noticeable. I used to run with 2x MSAA but turned it off because there is no difference.
Target FPS – Not needed for VR. Turn it off.
Antialiasing – This is where you select the antialiasing value. If you turned it on above, you can select 2x or 4x here. The difference should be significant but for some reason, it isn’t.
Gamma correction – Just makes the screen brighter or darker. Personal preference purely and also depends on your VR headset. Some tend to be brighter than others.
Full screen – Turn this off. It does have a minor impact on performance because of the way Widows handles the graphics pipeline.
Enable VR HMD – Yes, please and thank you!
Multi-GPU support – Lol.
VSync – Not needed for VR.
SSAO – It makes things better but has a minor performance cost. Not much difference either way.
HDR – Another important setting in my opinion. It really makes the colour pop and makes the game world feel much more realistic and natural. I normally dont care for colour but was surprised how much of a difference this made.
Sharpen – No noticeable difference, so I leave it off.
Use 4K texture – I turn this on but again, there is no noticeable differnmce.
Distant buildings – Buildings are not your priority in a flight sim, especially distant ones that you can’t even bomb. Turn this off.
2. NVIDIA Control Panel Settings

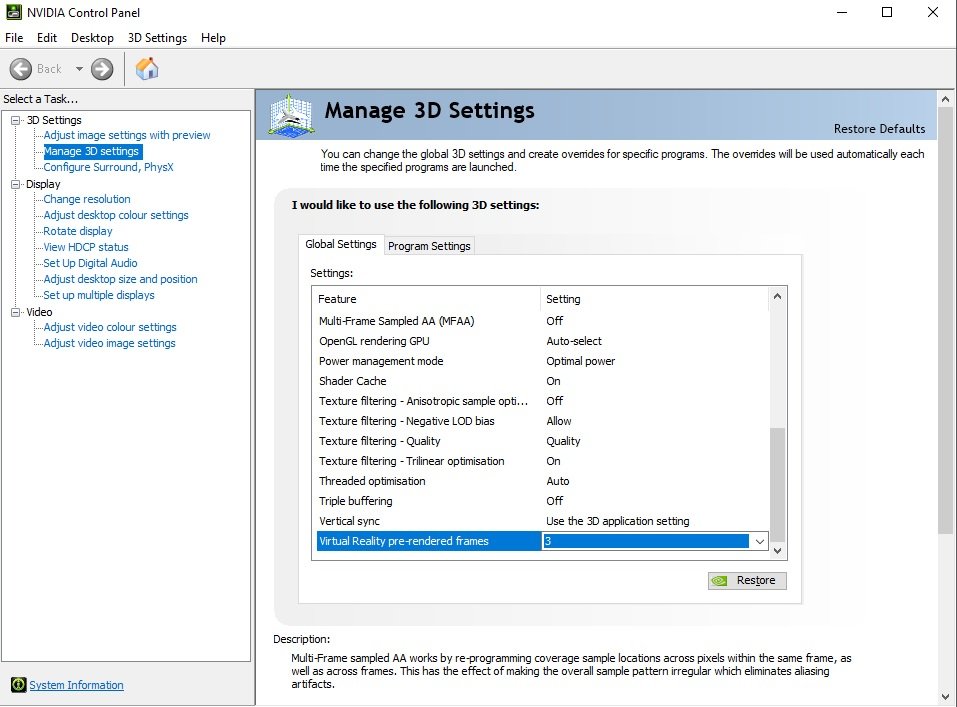
Nvidia control panel has some settings that you can tweak for VR in general.
Virtual Reality pre-rendered frames – This is a controversial setting as people have different takes on how effective it is and how you should use it. Essentially, the theory is that if you set it to say, 3, the CPU will buffer some additional frames which should improve performance. But since the frames are buffered in advanced, it can lead to input lag. So try it between 1 and 3 and see which you like.
Anti-aliasing – You can’t set anti-aliasing from the driver level for DX11 games so this is not really going to do anything. I only mentioned it because some guides tell you to tweak it form here and it wont do anything.
3. SteamVR Settings

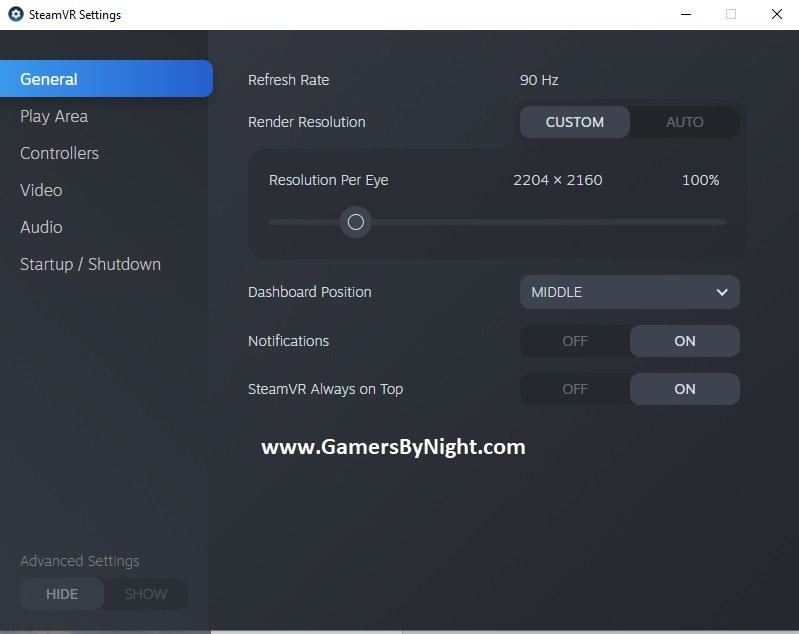
Motion Smoothing – Motion Smoothing is the name for Valve’s predictive algorithms that allows the GPU to guess the next frame so it doesn’t have to render it. What happens essentially is that if your GPU cant render 90 frames per second (amusing your headset is 90 Hz), Motion Smoothing will reduce the rendering to 45 FPS and guess the other frames based on previous frames. This reduces load for the GPU but can cause artifacts.
My advice is to turn it on but try to lower settings so that you stay above 90 FPS most of the time. In some cases, you might dip below and then it can be used as backup. WMR’s motion reprojection is also turned on by this very setting. Read the next section on WMR to know more.
Resolution – This is where you set your super sampling level. You have two choices here. You can target 45 FPS and go with motion smoothing/ reprojection to double it to 90 FPS. In that case, you can push up SS.
The other option is to try and get 90 FPS and in that case you will have to keep this setting low. It will look worse, but you will get better performance. Try both options and see what works for you. I use a Reverb for DCS these days and set it to 150% SS which is pretty high but I have a beefy computer and I still have to live with 45 FPS with reprojection to get to 90 FPS.
4. Windows Mixed Reality Settings
Note: The old method of editing the text file has been done away with. Read the new instructions here:
5.1. Motion Reprojection Setting Changes
This beta makes changes to how motion reprojection settings can be managed. Like before, the default.vrsettings file can be modified to specify the reprojection mode to use for all titles. As a reminder, the possible values are:
- disabled – motion reprojection is never applied.
- auto – motion reprojection is applied if the running title cannot maintain native framerate.
- motionvector – motion reprojection is always applied.
Alternatively, if you’re using Windows Mixed Reality for SteamVR in conjunction with the latest SteamVR release, you can now use SteamVR to manage motion reprojection settings on a per-application basis. To enable this functionality:
- Ensure you’re running a supported version of SteamVR (1.10.28 or greater).
- Remove the “motionReprojectionMode” line from default.vrsettings.
- In the SteamVR settings, select Video > Per Application Video Settings.
- Select the title you’re interested in, and change the motion smoothing option.
5.2. Motion Smoothing Setting
- Use Global Setting – no application specific override. The global default mode is auto.
- Enabled – motion reprojection runs in auto mode, applying reprojection if the application cannot maintain native framerate.
- Disabled – motion reprojection is never applied for the application.
- Force Always-on – application runs at half-framerate with reprojection.
5. Hardware Guides
No matter how much you tweak things, you can’t generate computing power out of thin air. These guides are meant to help you pick out the best hardware to make IL2 look and run great in VR:

